

:quality(85):upscale()/2025/03/14/675/n/3019466/d717bd7e67d4478fa92d99.10054136_.png)
:quality(85):upscale()/2025/03/14/684/n/1922153/9061fdbb67d44a8c57e045.05209788_.jpg)
:quality(85):upscale()/2025/03/11/733/n/49351765/71cd756967d066813fa3d9.97811721_.jpg)


Pineboards Modulo Series Review: All the extra features for your Raspberry Pi Compute Module 4 and 5

You pay for the quality, but for your money you get great PCBs, good quality components and great boards for your Compute Module 4 and 5.
Pros
- +
Easy to use
- +
Raspberry Pi 5 Form Factor
- +
PoE (Modulo5 IO PoE+)
- +
Pi 5 addon compatibility for CM4 (Modulo4)
- +
Quality PCBs
Cons
- -
Price is probably a little too high
- -
Camera / Display connector placement is awkward
Why you can trust Tom's Hardware Our expert reviewers spend hours testing and comparing products and services so you can choose the best for you. Find out more about how we test.
Poland’s Pineboards (formerly known as Pineberry Pi) has a history of beating Raspberry Pi to the market, a market that Raspberry Pi often kickstarts with a new product launch. We saw this with Pineboards’ Hat Drives, which brought PCIe based storage (and AI accelerators) to the freshly released Raspberry Pi 5. We even gave the Pineboard Hat Drive Nano a rare 5-star review because of its price and performance.
For Pineboards’ latest product line, our focus shifts from the Raspberry Pi 5, to the Raspberry Pi Compute Module 5 and the older Compute Module 4. The €35 ($37) Modulo5 Basic introduces a Raspberry Pi 5 form factor to the Compute Module 5 (CM5) which sees all of the ports on a Pi 5 replicated for the CM5. We also get the added bonus of being able to upgrade our Raspberry Pi Compute Module 5 when we need a little more RAM or storage.
For Compute Module 4 (CM4) users, the €35 ($37) Modulo4 looks identical to the Modulo5 but offers access to the same PCIe accessories, designed for the Raspberry Pi 5, and any Pi 5 cases or accessories. Essentially it offers a life extension to the CM4, which still has enough grunt to get the job done, by providing access to PCIe storage and AI accelerators.
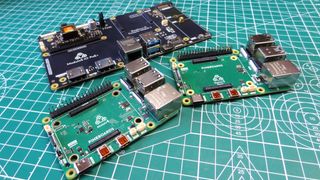
Compute Module 5 users have another board, the €47 ($49) Modulo5 IO PoE+ which offers all of the features found on the official Raspberry Pi Compute Module 5 Development Board (often referred to as a carrier board), but also includes Power over Ethernet. Something that Raspberry Pi announced along with the Raspberry Pi 5, but has yet to release.
In this triple review I’ll put each of the boards through its paces, and award an individual score at the end of the review.
Modulo5 IO PoE+
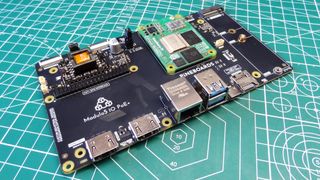
The Modulo5 IO PoE+ is a beefed up version of the official Raspberry Pi Compute Module 5 development board. Heck, the ports and footprint are identical! Sure a few things are moved around, but they are essentially the same thing. But, they are not!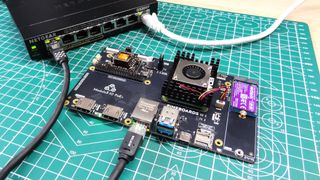
The key difference between the two is in its name PoE, Power over Ethernet. Yes, the Modulo5 IO PoE+ has built in PoE, before Raspberry Pi even released its version. PoE is useful for those projects where we need to power a Raspberry Pi in a location without ready access to power. You may want to build a wildlife camera in your garden, but don’t fancy digging up half the garden to properly install a mains voltage supply. PoE provides the network access and the power for your Raspberry Pi 5. Incredibly, the UK made PoE+ power module can provide 25W (5V at 5A) of continuous power (30W peak).
The best part of PoE on the Modulo5 IO PoE+ is that it just works. I used a Netgear PoE switch and I had zero config to do on the Raspberry Pi Compute Module 5. It just worked!
Power can also be provided by the USB Type C port; you’ll need the official Raspberry Pi 5 27W PSU, otherwise the CM5 will complain about low power.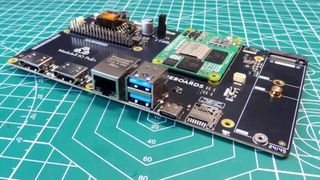
Just like the official dev board, Modulo5 IO PoE+ has an M.2 PCIe slot for an SSD, an AI accelerator or if you are daring enough, a GPU. If you are using a CM5 Lite board (no eMMC) then the onboard micro SD slot will come in useful. Two USB 3.0 ports, Gigabit Ethernet and dual HDMI ports round off the front edge of the board. Around the back we have dual camera / display connectors.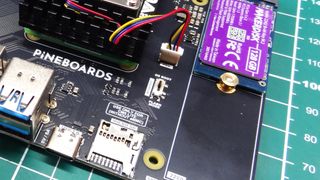
The Compute Module 5 can be flashed directly on the board, just set the RPIBOOT switch to flash mode, run the boot software on your PC, plug in and then flash the drive using Raspberry Pi Imager. The USB Type C port is “only” USB 2.0, but it is fast enough to get the image across. You can use any CM5 cooler with the Modulo5 IO PoE+, including the aforementioned EDA Tec cooler. There is a fan connector on the board, along with the SWD and RTC connectors. You can’t use the official Raspberry Pi 5 Active Cooler as there are no mounting holes on the board.
Testing the M.2 PCIe slot and I thought it was PCIe Gen 3 compatible. I looked at the Modulo5 IO PoE+ product page and saw nothing on PCIe speeds. So after setting up the CM5 to boot from a PCIe Gen 3 SSD, I went into raspi-config and set the CM5 to use PCIe Gen 3 speeds, rebooted and then ran a test using dd to read the drive to /dev/null. I got a speed of 893MB/s. Definitely PCIe Gen 3 performance!

The dual camera / display connectors work just like the Modulo5 Basic, and yes I did have to make the same configuration changes in order for the CM5 to see the devices. Both worked well and with no incidents. I even found a way to add the Modulo5 IO PoE+ to the Touch Display 2, creating an unholy union of tech.
If you want to use the GPIO, then go for it. There is a full HAT compatible 40-pin GPIO. But, the issue of the RP1 means that you will need to double check that your favorite HAT works. General GPIO use, such as projects with digital IO, I2C etc will work just like the Raspberry Pi 5.
Modulo5 Basic
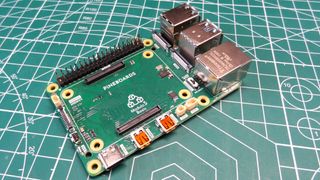
At a glance, this is a Raspberry Pi 5, but delving deeper, we can see that there are many key differences between the two. Chiefly, the CM5 PCB in the center of the board which has an almost similar layout to the Raspberry Pi 5. The SoC, RP1 and RAM are in similar locations. Only the eMMC (if your CM5 has it) is on the underside of the CM5.
The other differences are the location of the Camera / Display connectors, moved behind the USB ports and the ports for the RTC battery, fan and SWD debug. Everything else is as it is on a normal Pi 5. This means that the Modulo5 Basic can be used inside the official Raspberry Pi 5 case, other cases may require some tweaking.
The PCIe connector is in the same place as the Raspberry Pi 5 and that means we can use Pineboards HatDrive! Nano or another M.2 HAT for a full PCIe Gen 3.0 experience. I tested it and yes, we get the same performance as a regular Raspberry Pi 5.
Technically, the official Raspberry Pi 5 Active Cooler is compatible, but you need to use the included Modulo5 Basic compatible plastic plugs. I tried to put the active cooler on my Modulo5 Basic without the Modulo5 plugs and it was just too thick, because the CM5 sits on top of the connectors, raising it a few millimeters. You can get one side on, but the other side tilts upwards, with the plastic barb tantalizingly close to the Modulo5 Basic. Don’t try to force it! I did and I “slightly” warped the Modulo5 Basic’s PCB.
It bent back ok, and everything works! If you want cooling for your CM5, then use the official Raspberry Pi 5 Active Cooler with the Modulo5 Plugs! Or use the CM5 passive cooler (it comes with the official CM5 development kit) or the EDATec cooler which brings active cooling, fully controlled by the OS via the fan connector.
The various Raspberry Pi Cameras and the new Touch Display 2.0 work with the Modulo5 Basic but access to the connectors is tight, especially if the CM5 is already inserted. I used a plastic spudger to unlock and lock the plastic tabs. After that, I told the Raspberry Pi CM5 where to find my camera and screen. You see, the CM5 does not automatically detect the devices. You need to add some extra lines to /boot/firmware/config.txt in order for it to find them. I spent a little longer than I wanted on this step. Not the fault of Modulo, that lies with Raspberry Pi OS.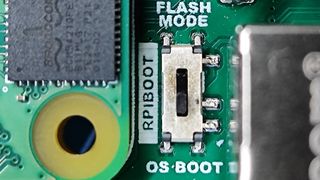
Flashing an OS to the CM5 via the Modulo5 Basic is really simple. On your PC, run Raspberry Pi’s RPiBoot application. On the Modulo5 Basic flip the switch to Flash Mode, then connect to your PC via the USB Type C cable. Press the power button twice and the CM5 appears as a USB device. All you need to do now is open Raspberry Pi Imager and flash your chosen OS.
Using the GPIO on the Modulo5 Basic is just as easy as a Raspberry Pi 5, and it comes with the Python and RP1 issues that face the Pi 5. I had an LED blinking and fully controlled from a push button with just a few lines of the GPIO Zero Python 3 code. Adding a HAT to the GPIO will vary greatly depending on software support. Newer HAT+ boards will work, but right now I’ve only used HAT+ boards that connect to the PCIe connector, not the GPIO. Using something like Pimoroni’s Explorer Hat Pro would require significant workarounds given the changes to how the Raspberry Pi’s GPIO now works.
Modulo4
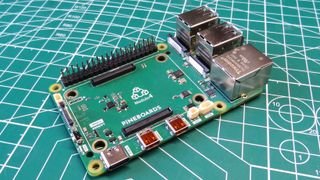
Putting the Modulo4 and 5 Basic next to one another is pretty much like the Spiderman pointing meme. They look very alike! There are only two slight visible differences. First, there is no switch for flashing the eMMC of your Compute Module 4 (if you have that version), but you can still flash the eMMC using this carrier board. Secondly, the USB ports are all USB 2.0, no USB 3.0 here!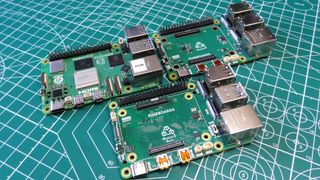
The camera connectors are in the same place. Note that I said camera connectors. There is no DSI connector for the Touch Display 2.0, and no, it won’t work if you try to plug it in. It just causes the CM4 to not power up. You need to remove the display and power on the Module4 and CM4, wait a few minutes and it will power on again. As for cameras, they work with just a little config.txt magic.
The GPIO works as expected for a Raspberry Pi 4, no RP1 issues here, but PEP668 still applies to the latest Raspberry Pi OS, so you will need to ensure that you are using Python virtual environments. I tested a quick GPIO Zero script to control an LED on GPIO 17, with a button on GPIO 27. That worked flawlessly. The HATs that I tested also worked. Pimoroni’s Unicorn HAT needed a little tweak inside of the virtual environment, but it worked. The Pimoroni Explorer HAT Pro, which uses digital IO, PWM and I2C installed into a virtual Python environment and just worked.
The Modulo4 also features a PCIe connector, and yes, the CM4 development board also features PCIe. On the official CM4 dev board it was broken out as a single-lane PCIe Gen 2 x1 slot. Modulo4 breaks this out to the same style PCIe connector as the Modulo5 Basic and the Raspberry Pi 5. To test, I connected the mighty Pineboards HatDrive! Nano with a Cytron MakerDisk. I wrote the contents of the eMMC to the SSD and then set the OS to boot from NVMe. Opening a terminal, I used dd to read the drive to /dev/null and achieved 415MB/s, in-line with PCIe Gen 2 speeds on the Raspberry Pi 5. We’ll never get PCIe Gen 3 on the CM4, but Gen 2 is plenty fast for this former flagship.
The PCIe connection can also be used with HAT+ boards, and so I delved into my box of bits and pulled out the latest AI HAT+ from Raspberry Pi. Yes, the Raspberry Pi AI Kit, designed for the Raspberry Pi 5 works with the Modulo4 and the Compute Module 4. You won’t get the same performance as a Pi 5, but it does work.
Who are the Modulo boards for?
Each of the boards has a specific user in mind. The Modulo5 Basic is aimed at users who want to use the CM5 with Raspberry Pi 5 accessories such as HATs and cases. This does sound niche, but hear me out. The CM5 on a Modulo5 Basic can be upgraded. Need more RAM, eMMC, Wi-Fi? Just buy the CM5 that suits your needs. You’ve got an upgradable “Raspberry Pi 5” that should do the job for a few years to come.
The Modulo4 is for those of us with a CM4 gathering dust in a drawer. With the Modulo4 we can use Raspberry Pi 5 HATs, PCIe products, AI accelerators and cases with the CM4. sure we don’t get the same performance as a CM5, but the CM4 has plenty of power to give, and without the added expense of buying into the CM5 range.
The Modulo5 IO PoE+ is the Rolls Royce of CM5 carrier boards. It gives us everything that the official development board offers, then gives us PoE. I can see myself using this board a lot more than my official development board. This is the board that you buy if you are serious about PoE and want to build a product that uses it.
Bottom Line
All of the Modulo boards are worth the money. Yes they are niche, but they work extremely well and the PCB quality is excellent.
*️⃣ Modulo4
Score: 4.5 / 5
The Modulo4 will squeeze a little more life out of the aging Compute Module 4, largely thanks to the easy PCIe connector and the plethora of Raspberry Pi AI products. As I’ve already said, you won’t get the same performance, but you won’t have to spend more money on a CM5.
*️⃣ Modulo5 Basic
Score 4 / 5
The Modulo5 Basic is a good compromise of the Raspberry Pi 5 form factor. It gives us the Raspberry Pi 5 experience, but with an upgradeable CM5 at its heart. This could be useful for those wanting an upgrade path that doesn’t require buying a whole new Raspberry Pi.
*️⃣ Modulo5 IO PoE+
Score 4.5 / 5
Finally, Modulo5 IO PoE+. This is an excellent PCB and credit to the design team for matching the port placement and footprint of the official development board so well. The addition of PoE makes this instantly more attractive than the official board, and we don’t lose any features for its inclusion.
So it all boils down to which board meets the needs of your projects. The price is decent, probably a little higher than some would pay. But you are paying for good quality PCBs and components, and not a clone board that uses poor quality parts.
Les Pounder is an associate editor at Tom's Hardware. He is a creative technologist and for seven years has created projects to educate and inspire minds both young and old. He has worked with the Raspberry Pi Foundation to write and deliver their teacher training program "Picademy".
What's Your Reaction?
 Like
0
Like
0
 Dislike
0
Dislike
0
 Love
0
Love
0
 Funny
0
Funny
0
 Angry
0
Angry
0
 Sad
0
Sad
0
 Wow
0
Wow
0