


:quality(85):upscale()/2023/12/19/785/n/1922729/af56211b6581d800beb0b5.47882612_.jpg)
:quality(85):upscale()/2025/03/24/966/n/1922153/d3be097667e1d8acdea7f5.75410388_.jpg)
:quality(85):upscale()/2023/10/19/829/n/3019466/0777c21e65317b66aff825.76129594_.jpg)
:quality(85):upscale()/2025/03/24/872/n/43463692/2d630b4c67e1b8f70ee911.30875468_.png)


Bambu Lab H2D Review: For Elite Crafters
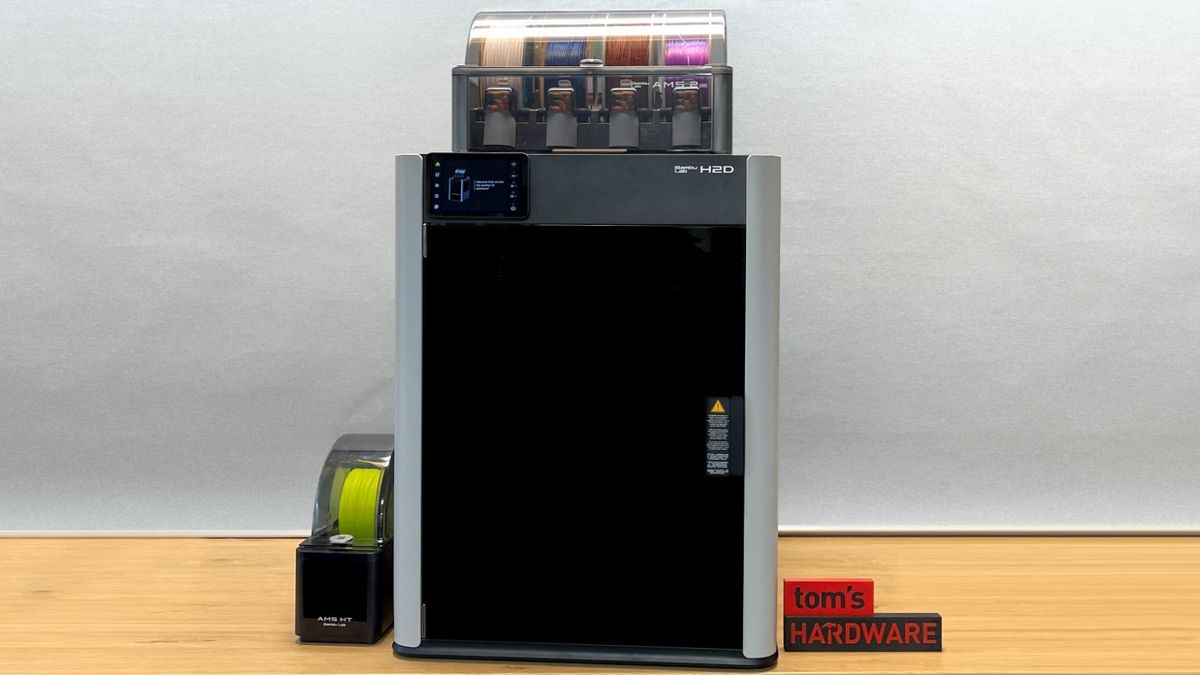
The Bambu Lab H2D is a premium 3D printer with a larger build volume, a faster AMS, and a filament-saving dual hotend. An optional deluxe laser combo turns the H2D into a mini craft factory that can print, cut and burn. The price for the full kit puts it out of hobby range, but is an excellent investment for serious crafters and small business owners. Bambu Lab knocked it out of the park, making the new functions seriously easy to use.
Pros
- +
Dual hotend saves material
- +
Larger build volume
- +
Enclosure for high-temperature printing
- +
Prints PLA with the door closed
- +
Perfect auto bed leveling
- +
Backwards compatible with current AMS
Cons
- -
Expensive
- -
Proprietary replacement parts
- -
All the extras are a lot extra
Why you can trust Tom's Hardware Our expert reviewers spend hours testing and comparing products and services so you can choose the best for you. Find out more about how we test.
The new Bambu Lab H2D takes a lot to unpack – literally. Between the recent controversy regarding third-party software and mods, the leaks, and the eight boxes of gear and material that Bambu sent for review, I was admittedly overwhelmed. Furthermore, despite those leaks – which were amazingly accurate – I had to start writing out the review without knowing the actual price of the H2D combo. For whatever reason, Bambu Lab was trying hard to keep at least the price under wraps until the very last minute.
The Bambu Lab H2D is an amazing machine and a worthy successor to the X1 Carbon. It checks off most of the boxes fans have been pleading for: It’s bigger, the nozzles are easier to swap, the AMS is heated, and it has an interesting dual-nozzle hotend that seriously cuts down on filament waste. The size makes it slightly slower than the X1C, which can be expected, but the faster AMS and dual nozzles pick up a lot of the slack.
The dual nozzles are hands down my favorite improvement on the H2D. I’ve seen this system before in the Snapmaker Artisan, which is also a 3-in-1 machine but with a printer, laser, and CNC. Bambu has something Snapmaker didn’t: automatic leveling and an eddy current sensor that makes aligning the two nozzles completely hands-free. When sold as a combo, the H2D becomes a five-color machine, with one AMS feeding into the right side nozzle and the single spool holder feeding the left. You could also buy additional AMS units for up to 24 spools.
Another big improvement over the Snapmaker is how easy it is to swap toolheads and workplates to switch from printing to lasering to cutting. The printing tool head never leaves the machine. The laser and cutting modules simply slide in front of it and hold fast with a lever. The work surfaces stick to the magnetic heated bed. My only problem with the machine is finding storage space for all its parts.
Only time will tell if adding lasers to the Bambu Lab H2D was a brilliant idea or a marketing faux pas, but I see where the company is going. The H2D isn’t aimed at the casual 3D printing hobbyist or the guy who can cobble together a Voron from spare parts in his garage. Bambu is firing a shot across the bow of xTool, Glowforge, and Cricut. By adding a laser, blade cutter, and pen plotter to the H2D, Bambu is marketing this machine to the elite crafter, the person who sells cutting boards, vinyl-covered Stanley cups, and tote bags at your local art fair.
The pricing (now that I know) starts where I was expecting for a larger Bambu machine and goes straight to “ouch.” The H2D as a stand-alone unit (no AMS) is $1,899 dollars and will be available to ship in June. This gives you the printer with dual nozzles, a single spool holder, and the normal accessory kit. Even without an AMS, this can be run as a two-color printer, but you would have to provide your own second spool holder as there’s only one spot to mount a manual spool holder to the machine. This might be a good option for someone with an older AMS lying about (it's compatible) or just wants the two-color printer and doesn’t mind printing a second spool holder. I really can’t image running this machine as a single-color unit.
The more popular version will be the H2D AMS Combo, which is the stock printer and the new AMS 2 Pro, for $2,199. This unit is in stock right now and will be able to ship immediately.
Next is the H2D Laser Full Combo with a 10W laser for $2,799. This has the AMS 2 Pro, plus a laser and cutting work surfaces, pre-installed safety glass, a bird's eye camera, and the emergency stop button. It will be available for pre-order and will start shipping at the end of April.
Finally, the big daddy H2D Laser Full Combo with 40W laser for $3,499. This has the AMS 2 Pro, plus a laser and cutting work surfaces, pre-installed safety glass, bird’s eye camera, and the emergency stop button. It will also be available for pre-order and will ship at the end of April.
I know the prices for the lasers seem a bit high, but these are not janky last-minute add-ons. The laser system is well thought out and very premium. The machine operates the laser and cutter completely hands-free, with placement handled accurately with a camera. You slide the material in and do the rest from the comfort of your keyboard. You only need to return to the machine for a final check (it is a laser after all, we need to stay safe) and press a button. You can continue to monitor the laser from your phone or computer – but please stay nearby. The H2D is flame retardant and very safe, but not magical.
Not every machine has to be made for beginners. The stock H2D will be more than enough for Bambu fans who crave extra room for their projects with much less waste. The full-blown H2D Laser Combo is for the elite crafter who is tight on space and wants a good laser for smaller projects. It's fast, precise, and the heated chamber combined with a dry box AMS make short work of engineering-grade filaments. Plus, you can print with the door closed to keep out curious fingers and paws. This is definitely one of my favorite printers and is a shoe in for one of the best 3D printers we’ve seen.
Specifications: Bambu Lab H2D
Swipe to scroll horizontally
Build Volume | 350 x 320 x 325 mm (13.77 x 12.59 x 12.79 inches)* |
Material | PLA/TPU/ABS/PPS (up to 350 degrees) |
Extruder Type | Direct drive |
Nozzle | 0.4mm proprietary |
Build Platform | PEI textured spring steel sheet, heated |
Bed Leveling | Automatic, hands free |
Filament Runout Sensor | Yes |
Connectivity | WiFi, LAN, USB Stick |
Interface | 5-Inch Touch Screen |
Machine Footprint | 492 x 514 x 626 mm (19.3 x 20.2 x 24.6 inches) |
Machine Weight | 1 KG (68.34 lbs) |
*Build Volume for Single Nozzle printing is 325 x 320 x 325 mm and 300 x 320 x 325 for dual nozzle printing.
Bambu Lab H2D: Included in the Box
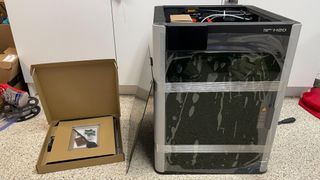
The Bambu Lab H2D comes with everything you need to get your printer set up, as well as a few extra parts. You get tools to maintain the printer, a spare hotend, two spare nozzle wiping pads, and a USB stick.
The printer is preloaded with test models, and practical prints for crafting tools. A razor blade and screws are included to make a DIY scraper. There’s also a paper getting started guide and instructions on how to access the slicer and phone app. The box has a QR code printed on the inside flap that leads to an unpacking video.
Design of the Bambu Lab H2D
The H2D is the deluxe big brother of Bambu Lab’s X1-Carbon 3D printer. It is a fully enclosed printer with an aluminum and steel chassis, plastic sides, and glass windows. The 5-inch touchpad is an upgraded version of the one found on an X1C.
There are many new features to cover, so let’s break it down. The H2D comes as both a “stock” printer and a “laser combo.” The stock H2D can be converted to a laser cutter, and both machines share the same 3D printer capabilities. We’ll start with the features you’ll find on both versions.
➡️Why use Dual Nozzles on the H2D?
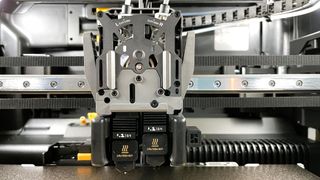
The H2D has two nozzles – a right and left – on one hotend. The two nozzles work together to print two colors without waste, or print two different materials at the same time. For example, you can print PLA with PETG supports, or combine TPU with the filament of your choice.
Each nozzle has its own Bowden tube and spool holder/AMS. The most common set up would be one AMS feeding into the right nozzle, and a single spool feeding into the left. Bambu Lab recommend this configuration because only the left nozzle moves up and down, and using it less frequently will save on wear and tear. They also recommend using the fixed right nozzle for TPU.
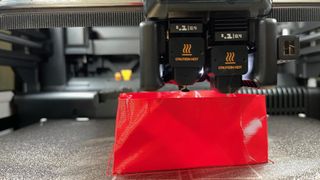
If you look closely at the right nozzle on the picture below, you can see the “flow blocker”, which is a little arm that sits underneath the non-printing nozzle tip. When the left nozzle is done printing, the nozzle will move up and the flow blocker will switch sides. The right nozzle is stationary on the toolhead.
➡️ Does the H2D use A1 Nozzles?
Bambu Lab has adopted the A1-style nozzle for the new H2D. These nozzles are much easier to change as they are held on with a clasp and magnet. All the wiring remains on the toolhead. The H2D nozzles have been improved, so it is not recommended to use old A1 nozzles on the H2D. You can, however, use H2D nozzles on the A1.
And yes, the left and right nozzles are identical. At the moment the slicer does not support mixing nozzle sizes, so you can not use a 0.6 and 0.4 nozzle on the same print.
➡️ How big is the Bambu Lab H2D?
The H2D is a larger machine, with a 350 x 320 x 325mm total build volume.
➡️ Do Dual Nozzles affect the H2D build size?
Yes, the dual nozzles will affect how big you can print. The plate is essentially split into three regions: left, center, and right. Both nozzles can print in the middle, giving you a 300x320x325 mm build volume.
You get an additional 25mm on the edges for single nozzle printing (left or right): 325x320x325 mm. Though the two nozzles work together, the slicer will not allow you to print across the whole build plate in a single color. You could fill the plate using two colors. For example, a red model is on the left, and a black model is on the right.
➡️ What is the Bambu Lab AMS 2 Pro and AMS HT?
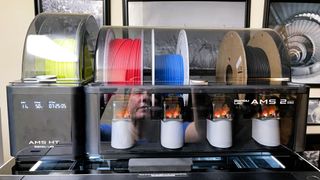
Bambu improved their signature Automatic Material System (AMS) for the H2D, adding a heater and vents, allowing it to dry your filament. The vent automatically opens during drying cycles to release damp air and can remain closed to maintain a dry environment during storage or printing. The drier does not operate during printing and instead depends on a tight seal and a packet of desiccant to keep your material cozy. When you set up the drying function, the screen will ask you to tuck the filament ends into the spool’s sides and give you the option of rotating the filament while drying.
The AMS 2 Pro is the four-spool model, while the AMS HT is a single-spool device. The AMS 2 Pro can heat up to 65 degrees Celsius (C), and the HT can go to 85C. The HT unit also has a bypass allowing you to feed soft TPU or gritty carbon fiber without going through the feeder motor – instead it simply freewheels and allows the toolhead to pull the filament through.
The AMS 2 Pro also winds spools noticeably faster and keeps the Bowden tubes in the open for easier access should filament break while in the AMS.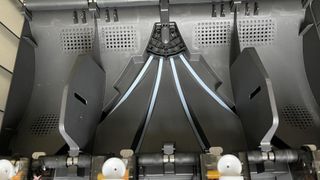
The H2D can use up to four AMS units and eight AMS HT units simultaneously. I have no idea where you’d put them, but it’s an interesting fact to know.
The older Bambu Lab AMS is compatible with the H2D, which is great news for people upgrading from older Core XY units. If you want to experiment with a 16-color print, you can borrow older AMS units.
➡️ Is the AMS 2 Pro and AMS HT compatible with the X1 Carbon or P1S/P1P?
Yes, for the AMS units. At launch, both new AMS units can be connected to an older Bambu Lab Core XY for material feeding, but the dryer will need to wait for a future firmware update and separate power supplies.
➡️ Is the AMS 2 Pro and AMS HT compatible with the A1 series?
No, the A1 has a fundamental difference in how it feeds material and can not be made compatible.
➡️ How many cameras does the Bambu Lab H2D have?
The H2D has three cameras, plus a fourth for the laser combo.
The main three are all 1920 x 1080: one for live monitoring, one on the nozzle for AI detection, and one on the toolhead.
The live preview is for the user and shows up in Bambu Studio on the device page, on your Bambu Handy app and on the screen itself – helpful on the Laser Combo as the dark green glass is difficult to see through. It can also capture timelapses.
The nozzle camera can detect “spaghetti”, air printing, nozzle clumping and when the poop chute is getting clogged.
The toolhead camera is for checking accuracy during calibration and reading the codes on the build plates.
The fourth camera is a more detailed, eight megapixel (3264 x 2448p) and comes with the laser combo. It’s optional for the stock printer. This “Bird's Eye” camera is used to position materials for cutting.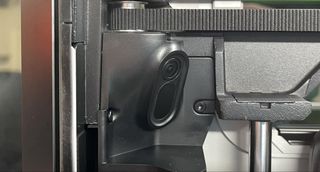
➡️ What kind of laser and cutter does the H2D have?
The Laser Combo comes with a 10-watt laser, a blade tool, and a pen holder with two sample makers. Many round barrel-thin markers with stiff tips will work, though Bambu Lab will have markers available in their store. A 40-watt laser is available as an optional accessory.
➡️ What kind of Laser safety and ventilation does the H2D have?
The stock H2D can be upgraded to the laser edition, which means both units have a fire retardant inner chamber.
The Laser Combo comes with pre-installed green laser safe viewing panels, which are an optional upgrade for the stock machine. It’s pretty hard to see through the green panels, but the monitoring camera gives you a crisp 1920x1080 image right on the touch screen, your computer and the mobile app.
The H2D has automatic vents and fans to do a number of things. An intake vent on the top pops open when it needs cool air for PLA or PETG, or to push air into the filtration system. A rear vent is likewise automatic and can open or close as needed. The H2D can close the vents to retain heat for high temperature printing, or in the event of a fire shut off air flow to smother any flames. (More on laser safety later.)
An active chamber heater can boost the interior temperature to 65C.
This means the H2D can run anything and everything with the door closed. I love seeing this in new printers, because I run a lot of PLA and hate having all my doors hanging open. Being able to keep the door closed is also great for families with small children or curious pets.
While testing the chambering cooling, I accidentally tripped the temperature sensor for PETG – the interior chamber hit 45C and the H2D paused itself until I could assess the problem. It turned out to be operator error: I had left the rear vent hooked up to the laser’s external air filter but had not turned it on. Since I didn’t want the noise of the filtration system, I simply discontented the hose, which provided enough air flow. The chamber immediately returned to a normal temperature of 31C.
While we’re on the topic of ventilation, both versions of the H2D have a HEPA grade, activated carbon filter to keep particles and VOCs out of your room.
➡️ What platforms and build sheets does the H2D have for printing, laser and cutting?

The H2D comes with a standard PEI flex sheet. If you opt for the Laser Combo you’ll also get a sturdy metal tray for the laser that can hold slats, and a sticky metal plate for the cutter or pen. Both of these work plates fit on top of the heated bed and use magnets to hold them in place.
An optional “vision encoder” plate is for 3D printing with exceptional precision. It is covered in a tiny grid that the toolhead reads for special optical measurement tracking. Bambu says this plate can ensure a XY-axis calibration solution with a 50µm motion accuracy.
➡️ What is Bambu Lab doing to keep my data safe?
One of the hot topics recently isn’t about the H2D at all, but how Bambu Lab is treating 3rd party companies who want to make accessories and software for its printers. Bambu Lab is insisting that much of the controversy is a misunderstanding, and they will keep its printers accessible to whatever software and mods users want to install. The proof is in the pudding, as they say, and the H2D has a great new feature: a USB port. This allows users to completely isolate their printer from the internet by transferring files offline. Firmware will also be available to download on a separate computer and transferred by USB.
Bambu Lab is also keeping LAN mode alive, though it will be called “developer mode.” I haven’t been able to test this feature yet, as it will go live after the H2D is made public.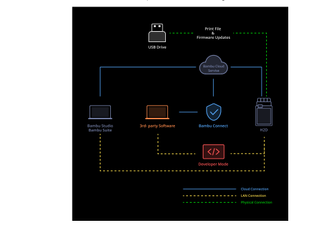
Assembling the Bambu Lab H2D
The Bambu Lab H2D comes fully assembled and only needs to be unpacked.
Leveling the Bambu Lab H2D

The Bambu Lab H2D has an excellent auto leveling system combined with vibration compensation and pressure advance. Due to the dual nozzle system, the initial self check and leveling will take a good 45 minutes. Thankfully, the machine handles this itself, and you can go get a sandwich and come back when it’s done.
The H2D will check the bed level before prints like the X1-Carbon, and I haven’t had any issue with the z height during my tests.
Loading Filament on the Bambu Lab H2D
Bambu Lab sent both the AMS 2 Pro and AMS HT, so I didn’t even bother with manual spool holders. Filament loading and unloading is a breeze when handled by the machine. You only push filament 2 cm into the feeder and it automatically slurps it into the system.
The only thing of note here is the AMS unit should be fed into the right nozzle and the left nozzle given the single spool.
Preparing Files / Software for Bambu Lab H2D

Bambu Studio has been given an overhaul for the H2D, and I got a sneak peek for the review. The new version is for all Bambu Lab printers, so everyone benefits. The main thing you’ll notice are visual representations of the printer, and it’s build plate, so it's easier to make sure you’re on the right settings. Syncing the printer and AMS now work much smoother, and remapping the filament is easier.
The H2D has an extra option you won’t see on other printers: filament saving mode. When you slice a model, the slicer can calculate which color/material to place on the left nozzle in order to save the most filament. This is because there’s no need to purge the left nozzle. I’ve saved hundreds of grams of filament using the H2D.
If you don’t want to use the slicer’s suggestion, you can opt for “convenience” or “custom” mode. Convenience mode assigns colors according to what is physically placed in the printer at that moment and will try to save filament based on an algorithm. Custom allows you to rearrange the spools as you would like them. Custom is good for when you have a “special” spool that you don’t want to waste, like a color you’re running low on or a special color you don’t want to waste. I can also see this coming in handy if you want to run an odd sized/oversized spool on the left nozzle using a manual spool rack.
Bambu Suite
But wait, there’s more! If you have the Laser Combo, you get a second program - the Bambu Suite to prep files for the laser, blade, and pen. This program is similar to what xTool uses, with a simple graphics editor for translating graphics into code the H2D understands.
This program uses the onboard camera to ensure you have the right laser or blade cutter platform. If you use materials from Bambu Lab’s store, the H2D can read QR tags on the material to automatically select the proper settings.
Printing on the Bambu Lab H2D
Our H2D didn’t seem to have any sample filament packed with it, though we did receive a generous box of filament for testing that arrived a few weeks later. If you decide to order an H2D, I would make sure you select a bundle that comes with filament. Check out our guide to the best filaments for 3D printing for more suggestions to keep your AMS 2 Pro happy.
The printer came with several pre-sliced files to print, many of which are helpful tools for paper projects. But I’m most interested in how the printer worked with files I sliced myself.
Here’s a “speed Benchy” models, which is the popular 3D Benchy sliced according to the official #speedboatrace contest rules. This boat has 2 walls, 3 top/bottom layers, 10% infill and use a .25 layer height and .5 layer width. This was printed using default speed settings, and came out in 21 minutes and 30 seconds, which is pretty respectable. There’s no rings, the walls are smooth and the smoke stack is perfect. This was printed in ordinary Inland Grey PLA.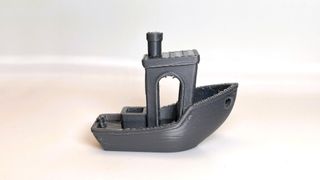
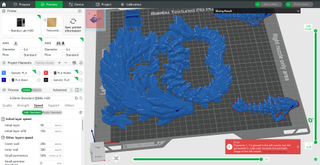
I was most curious about how the dual nozzle would save time and filament. Since the H2D arrived just in time for the high school production of The Little Mermaid, I printed 114 “mermaid tails” for the entire cast using several different multicolor printers. I used the same file across several printers while alternating colors, so in the screen grab below the yellow was the accent color (in this photo, white) while blue represents the body, which for this tail was Inland’s Twinkle Rainbow. You can tell for this two color print, we only lost about 0.38 grams in flush – which was for the initial nozzle cleaning – and 2.22 grams in the prime tower. It printed in eight hours and four minutes using default speed settings and a 0.2mm layer height.
For comparison, my smaller Bambu Lab P1P printed the same thing (6 tails) ten minutes faster but wasted 6.54 grams in the purge. The P1P is slower to swap colors but has a faster 10,000mm/s² acceleration rate compared to the H2D’s 8,000mm/s² acceleration rate.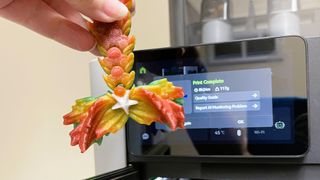
Polymaker sent a stack of CoPE to check out, so I thought I’d use it on the H2D. CoPE is a material Polymaker believes can replace PLA. It’s a cheaper material made of “Co-Polyester” which is durable and able to run at speeds up to 400mm/s. It’s a bit related to PETG, so layer adhesion is good – and too good for PEI plates. You definitely need to put down a layer of gluestick to keep it from permanently sticking.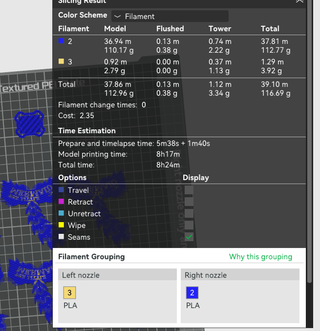
This dragon book nook was printed in shades of blue and purple CoPE. The black box is Protopasta Empire Strikes Black PETG and was printed separately. The dragon and claw printed in 36 hours and 50 minutes, using a 0.2 layer height and standard settings for high-speed PLA, as there are no settings yet for CoPE. It’s hard to tell, but this is a five-color print: purple, blue, teal, and black on the head, and purple and stone grey on the claws. The slicer decided it could save me 198 grams of the blue filament used on the horns. It still wasted 108 grams in printer poop and another 120 grams in the tower.
Could I have saved more filament by using fewer colors? Probably, but the point was to run five colors and see what happens. Overall, I’m pleased with this print. Most of the color swaps are super clean (the light blue has a little support stuck to it), and you can only see the layer lines when you look very closely.
The box took another 4 hours and 46 minutes to print using standard 0.2 layer heights and ordinary settings.

For PETG, I printed a Clockspring3D box. I blew it up to 150% and printed it in Greengate American Blue recycled PETG. I used a 0.2 layer height and default settings, which printed in about nine hours and 14 minutes. The finished box is a fantastic print with smooth layers and no stringing.
The only problem I had with this print was forgetting to unhook the vent hose from the laser’s air purifier. This reduced airflow enough that the chamber hit 45C and triggered a safety warning. After discovering my error, I unhooked the vent, and the chamber was able to return to normal for PETG 30C. The printer is configured to run with the door closed at all times. It will allow you to keep the door open if you wish, but the little robot assistant will sit there staring at you with a frowny face.?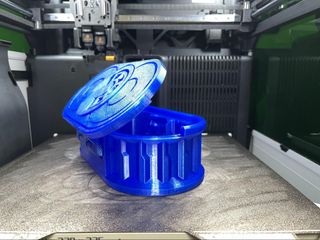
To fully test the H2D’s high-temperature 3D printing abilities, I printed a hammer in Bambu Lab’s PAHT-CF. This is probably an extreme waste of filament, but since I didn’t need to print any parts for my jet engine, this will do. Bambu suggested swapping to a 0.6 nozzle, which was super easy to do with the A1-style nozzle. A screen on the printer menu helps you select the right nozzle and then runs a check to inform the slicer of the adjustments.
This print ran in one hour and 51 minutes, using the slicer’s default settings and a 0.3 layer height. The supports came off extremely easily, and the carbon fiber added a classy finish. It’s a bit light to really hammer nails, but it will work to hammer prints off my resin build plate. The print is very stiff, and I haven’t been able to break it.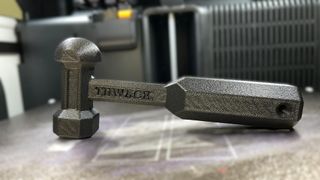
For TPU I printed my favorite paper bag model at 75%, in vase mode with a .28 layer height for extra speed and a 0.5 line width to make it more sturdy. The bag came out perfectly, though the method of getting the filament to the nozzle was a little janky. It printed in one hour and 23 minutes using default speed settings, using Fiberology red TPU.
In order to print TPU, you need to bypass the buffer and feed directly into the hotend. The only way to bypass the buffer is to take the lid off and drop the filament in from the top. If you have the manual spool holder attached, its probably not a big deal, but since I didn’t want to dig it out, I just put the spool on top of the other H2D. Yes, I’m using half a filament dryer as a spool holder – I also didn’t want to unplug the HT AMS from the other unit. It was late, ok?
Switching to lasers, I mainly played with the 40-watt laser. The system is very easy to use, and advanced features are tucked out of sight for more experienced users.
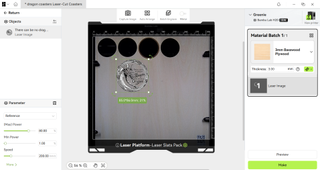
For a quick overview, here is a selection of coins I made with the 40-watt laser on basswood, hardwood ply, and black acrylic. I used a piece of clipart brought into the program as a jpg, traced it, and drew a circle around it in Bambu Suite.
The default settings were a little light on the engravings for my tastes, but the cutting was spot on. I increased the burn time a little and was very pleased with the results. None of these pieces took more than two minutes to engrave and cut. All materials are supplied by Bambu Lab and will be available in the store.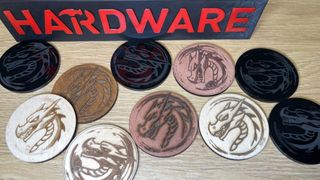
Another project I was able to whip up involved more clip art from Canva. This time, I added text to clip art, brought it in as a jpg, and simply engraved the image onto a piece of cork provided by Bambu Lab. I used Suite to cut out the cork. Then, I made a coaster holder in Tinkercad and printed it in PETG. The two items fit snuggly together and didn’t require any glue. The finished coaster is about 100mm wide and accommodates my largest coffee mugs. The coasters took one hour and 45 minutes to print four, and the coasters took about 30 minutes to engrave and cut six.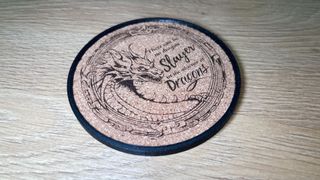
Finally, I want to show you the cutter and pen plotter. I have the least experience with this method but it’s really fun and I think it would be good for making stickers and price tags. You should be able to cut sticker sheets printed on your 2d printer, but I wasn’t able to quite figure that one out. I’ll do more research now that the printer is public.
What I was able to sort out was very easy. The dragon is clipart from Canva, while my logo is a PNG from another program. I imported both, traced them quickly in Suite and hit print. The marker whipped these out in about 30-45 seconds each. I switch to the cutter and drew a circle around the dragon and sliced it out in a few seconds.
If this is your first time using a digital paper cutter, the H2D comes with tools you can print out, like a weeder, scraper and roller. The machine can also do vinyl and cut thin leather.
Bottom Line

Bambu Lab continues to surprise everyone, and the H2D may not be the 3D printer you were asking for, but it’s definitely worth considering if you love crafting. Even if you’re not interested in the Laser Combo, the stock printer is well worth it for the extra size and its ability to save filament.
Makers who want to “do all things!” will love the space-saving appeal of a 3-in-1 printer that actually performs exceptionally well. Unlike the Snapmaker Artisan, swapping between modes is as simple as slapping in a new build plate and throwing a lever on the toolhead. If you’re a small business owner and not ready for a massive CO2 Glowforge, then the H2D will scratch that laser engraving itch.
I’ve seen people in the 3D printing community scoff at the notion of a 3D printer that can also cut and engrave. But I also know that small business people will love a machine that can make 3D printed art, practical parts AND cut out price tags or make neat wooden ornaments and display pieces.
With retail pricing starting at $1,899 and going up to $3,499, it’s not the first printer I’d recommend for someone starting out. But if you’ve got a dab of experience with lasers or cutting tools and are short on space – the H2D Laser Combo is pretty sweet.
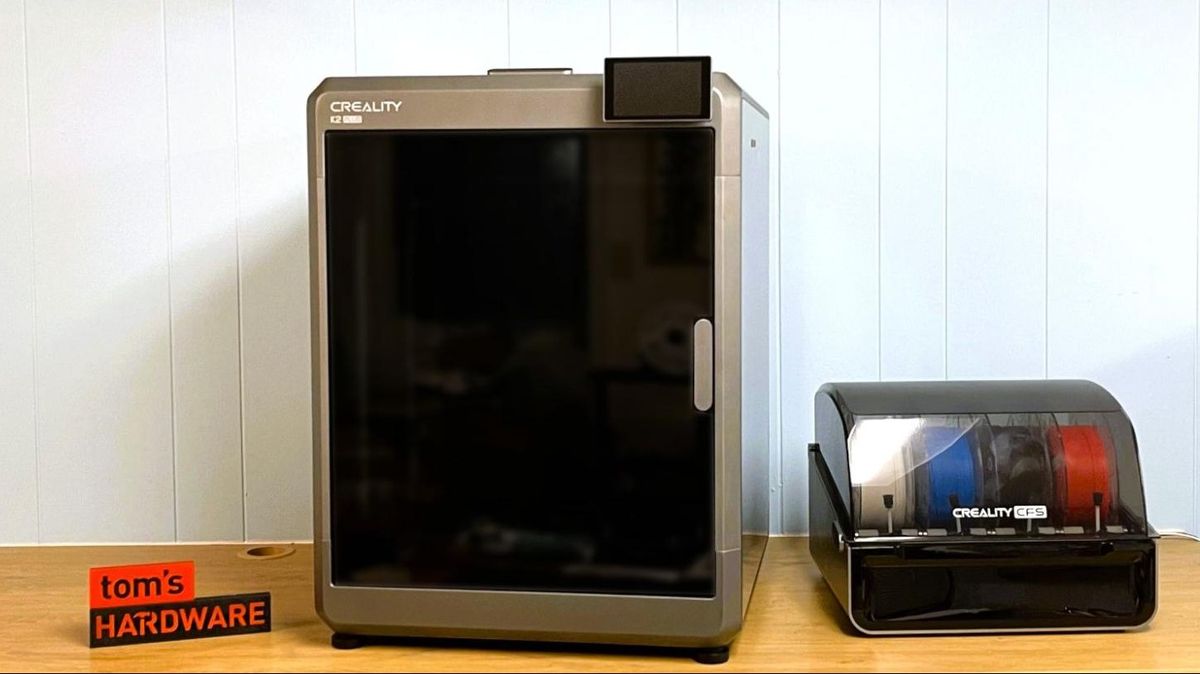
If the Bambu Lab H2D seems out of reach, I’d suggest checking out the Creality K2 Plus, a larger-format Core XY with a standard AMS for $1,499. As far as we know, the Bambu Lab P1S isn’t going anywhere, and it’s still a solid choice for four-color printing. The P1S Combo is currently $849.
MORE: Best 3D Printers
MORE: Best Budget 3D Printers
MORE: Best Resin 3D Printers
Denise Bertacchi is a Contributing Writer for Tom’s Hardware US, covering 3D printing. Denise has been crafting with PCs since she discovered Print Shop had clip art on her Apple IIe. She’s been a freelance newspaper reporter, online columnist and craft blogger with an eye for kid’s STEM activities. She got hooked on 3D printing after her son made a tiny Tinkercad Jeep for a school science project. Excited to learn more, she got a Creality CR10s and hasn’t looked back. She loves reviewing 3D printers because she can mix all her passions: printing, photography and writing. When she’s not modding her Ender 3 Pro or stirring glitter into a batch of resin, you’ll find her at the latest superhero movie with her husband and two sons.
What's Your Reaction?
 Like
0
Like
0
 Dislike
0
Dislike
0
 Love
0
Love
0
 Funny
0
Funny
0
 Angry
0
Angry
0
 Sad
0
Sad
0
 Wow
0
Wow
0